How to Install PS2 BIOS on PCSX2, AetherSX2, and RetroArch

Setting up the PS2 BIOS for each emulator is slightly different. Although they all run PS2 games, each performs best on other devices. For example, AetherSX2 and RetroArch are best compatible with Android and iOS. At the same time, PCSX2 is the best among PC users because it runs games more smoothly and supports more titles.
If you’ve installed one of these emulators on your PC, phone, or tablet, and you want to set up the BIOS to start playing games, this guide will help you. We’ll show you the exact steps to get each emulator working properly.
RetroArch, PCSX2, and AetherSX2 are the best PS2 emulators out there. Ensure your device meets the recommended requirements; installing and setting up the BIOS should be quick and easy.
What is PS2 BIOS, and why is it needed?
The PS2 BIOS, which stands for Basic Input/Output System, is software that helps the PlayStation 2 emulator run games; it performs tasks acting as the brain of the original console. Instructing the emulator how to start and manage the system like a real PS2.
Emulators like PCSX2, AetherSX2, and RetroArch can not run games without a BIOS file on their own. They rely on the BIOS to mimic how the real PlayStation 2 works. Without it, the emulator won’t know how to launch games or handle system functions.
Installing PS2 BIOS on PCSX2 (Windows/Linux)
If you want to use PCSX2 on Windows or Linux, follow these steps to install the PS2 BIOS file.
Step 1: Download and Install PCSX2
Visit the official PCSX2 website and download the latest version of the emulator. Select the portable version that is best for downloading anything.
After successfully downloading, use WinRAR or 7-Zip to extract the .zip file. Put the extracted file in your chosen folder.

Step 2: Obtain PS2 BIOS
You will need PlayStation 2 BIOS files to use the emulator. You can use the already dumped BIOS file from your PS2 BIOS console; move that file to your PC.
If you have not, follow our guide on how to legally dump your PS2 BIOS from your console.
Step 3: Configure BIOS in PCSX2
Now you have successfully dumped the BIOS file; follow these steps to Configure BIOS in PCSX2
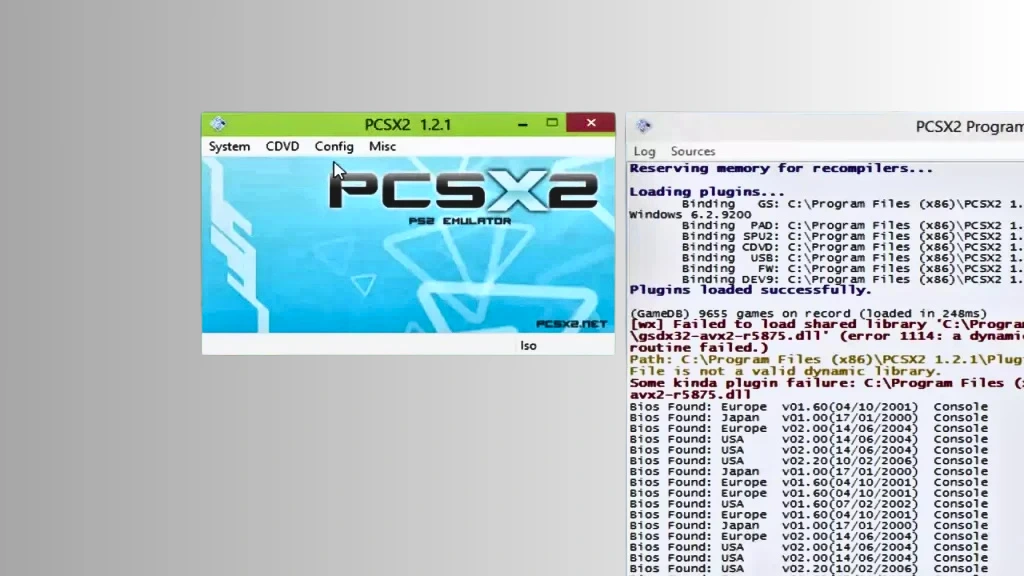
1. Open the PCSX2 emulator.
2. Go to the Settings or Configuration menu.
3. Find the BIOS section.
4. Choose your “PS2 BIOS” folder as the BIOS directory.
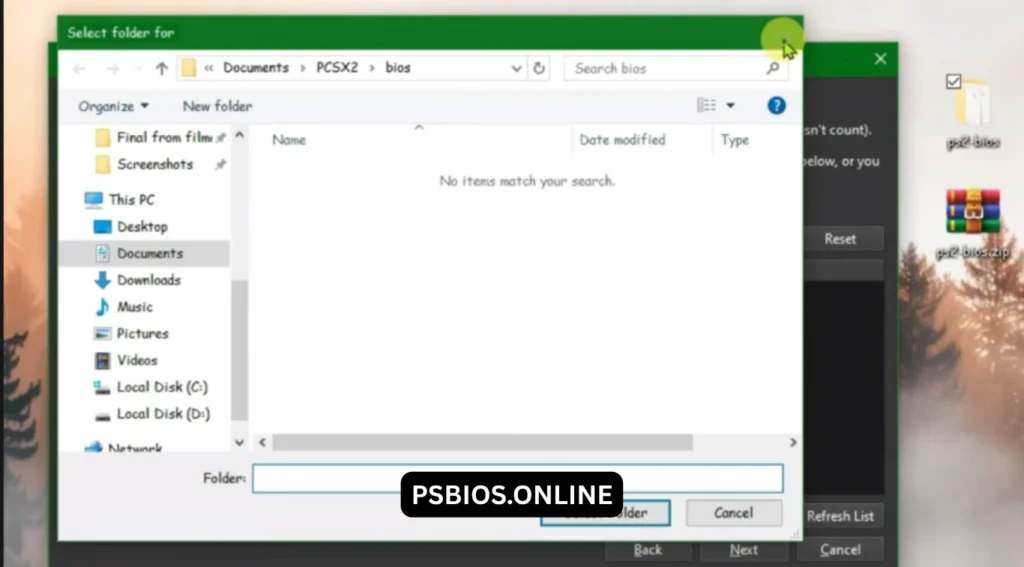
Now, PCSX2 will recognize the BIOS file, and you can play your favorite games.
Step 4: Load and Play Games
Now that we have set up the BIOS, our system is ready to play PS2 games. PCSX2 uses game files called ISOs, which are digital copies of PS2 discs.
Ensure you have PlayStation game ISOs on your PC. Once you have checked, open PCSX2, go to CDVD or ISO Selector, and click Browse to load your game file. To keep your games organised, add your ISO folder under Settings > Game List, and PCSX2 will display them in a list for easy access.
Once ISO is selected, go to System and choose ISO Boot (fast) or Boot ISO (complete) to start games. If it runs smoothly, your BIOS is set correctly.
Installing PS2 BIOS on AetherSX2 (Android)
AetherSX2 is an excellent selection for Android users to play PS2 games. Ensure your device has at least a Snapdragon 800+ processor and 8GB of RAM for the best performance. Here is a step-by-step guide to get that work
Step 1: Download AetherSX2
Since AetherSX2 is not available on the Google Play Store, we need to get the APK directly from the official website and download AetherSX2.

Step 2: Transfer BIOS to Device
Move the files to your Android phone after successfully downloading and extracting the BIOS.
How to transfer the BIOS:
- If you are using a PC, connect your mobile device to a USB cable and copy the extracted BIOS file to your storage.
- If you have downloaded it on your mobile, use ZArchiver to unzip the BIOS.
Step 3: Configure BIOS in AetherSX2
Now open the AetherSX2 app to load the BIOS.
Steps:
- Launch AetherSX2 and tap “Import BIOS.
- Find and select the BIOS file from the folder you created.
- The app will confirm it by showing the BIOS name. If it appears, it’s ready to use.
Step 4: Load and Play Games
Now, you can add your games; follow these steps carefully.
- 1. Create a folder named PS2 Games in your storage.
- 2. Move your PS2 game files (ISO or BIN format) into that folder.
- 3. In AetherSX2, tap “Browse” and select the PS2 Games folder.
- 4. Your games will show up. Tap one to start playing!
Installing PS2 BIOS on RetroArch (Android & iOS)
RetroArch is one of the most powerful emulators that works on multiple devices, including Android, iOS, and Windows. To install the PS2 BIOS on RetroArch and play PS2 games, follow these steps.

Step 1: Install RetroArch
Download the RetroArch emulator from the official site: https://www.retroarch.com.
- For Android, get RetroArch from the Google Play Store.
- For iOS, download it from the Apple App Store.
Once successfully installed, open RetroArch and close it; this will create an essential folder in your device’s storage.
Step 2: Add PCSX2 Core
Now open RetroArch and go to settings. Look for Load Core, click on it, and then choose Download Core. Find Sony, PlayStation 2 in the list, and download it. Upon successfully downloading, load the core by selecting load core and choosing the PS2 core.
Step 3: Transfer BIOS to RetroArch
Now, look for the BIOS folder in the file manager. Internal Storage> RetroArch > system > pcsx2 > bios.
If you cannot find it, it probably does not exist. Create it manually, and move your extracted PS2 BIOS file into this BIOS folder.
Step 4: Configure BIOS in RetroArch
Navigate to the settings in RetroArch and confirm if the BIOS is recognised. The app should automatically detect the BIOS file in the correct folder. You can check if the BIOS file is configured successfully by launching a PS2 game.
Step 5: Load and Play Games
Create a separate folder for your PS2 games and add your ISO files. Now launch RetroArch, load content, and select the game from the game folder. If the BIOS and core are set up correctly, the game will run smoothly.
Troubleshooting Common Issues
Although while setting up everything correctly, you might face fewer problems using PCSX2, AetherSX2, or RetroArch
Here are the most common issues with the fixes.
BIOS not detected.
Problem:
Errors like “BIOS is missing or doesn’t detect” in Emulator,
Solutions:
- Check File Format: Check the file format and ensure the BIOS file is correct, such as .bin, .rom, or .iso.
- Set the Correct Folder: Double-check the folder you have selected. The emulator’s BIOS settings store your BIOS file in this folder.
- Use a Valid BIOS: Check if the BIOS file is properly dumped since some files online may be incomplete or corrupted.
Emulator crashes.
Problem:
The Emulator freezes frequently while playing a game or closes suddenly
Solutions:
- Update the Emulator: Ensure you have the latest version of the Emulator you are using, like PCSX2, AetherSX2, or RetroArch
- Check System Requirements: this is the most critical factor; a weak processor or low RAM can cause crashes. Ensure your device meets the recommended specs.
- Change Settings: Disabling enhancements like texture filtering, changing the graphics renderer to DirectX or OpenGL, and lowering the resolutions.
Pro Tip: Close too many applications running in the background, as they can cause crashes, especially on mobile devices.
Game compatibility problems.
Problem:
If you have issues like games not loading, having graphic glitches, or not playing properly, here is the solution.
Solutions:
- Check Compatibility Lists: start with checking the emulator compatibility
- For PCSX2: PCSX2 Compatibility List
- For RetroArch: Use the “Core Info” to see which games run best on each core.
- Try a Different Core: check that the different code (like PCSX2) is not working; try another one.
- Use Different BIOS Regions: try to use different BIOS from the same region, as some games run better with a BIOS.
By following these fixes, you can solve most irritating issues and make your System run PlayStation 2 games smoothly while choosing your favourite emulators.
Frequently Asked Questions (FAQs)
Can I use the same BIOS file for all emulators?
Unfortunately, you cannot use the same BIOS file for every emulator. Most PS2 emulators, like RetroArch’s PCSX2 core and AetherSX2, required a PS2 BIOS. They have their specific needs as per their requirements. Selecting the wrong BIOS file can cause errors like crashing games and stopping games from working.
Why isn’t my emulator recognising the BIOS file?
If your emulators do not recognise the BIOS file, you must have selected the wrong file format. The correct file formats are usually .bin, .rom, or .iso. Ensure you have selected the proper format.
Other reasons include an incorrect BIOS folder, a missing or incomplete BIOS, the wrong region, and an outdated emulator. These are some of the most common reasons why emulators are not recognising the BIOS file.
Conclusion
That’s the complete guide you need to set up the PS2 BIOS on RetroArch, PCSX2, or AetherSX2. By following these steps, you can get your game to run smoothly on any device, such as a PC, Android, or iOS.
Each emulator is compatible with a different device. If everything is set up accordingly, they offer a smooth and reliable way to enjoy classic PS2 titles.
If you encounter any issues during setup or have any questions, leave a comment, and we will get back to you as soon as possible so you can get the best gaming experience possible.